background

Showing posts with label cards. Show all posts

Monday, April 4, 2011

Let the Cute Begin

My friend Megan and her husband Ryan will be having their first baby in May and I can't wait until the little princess arrives. Megan and Ryan are going to make wonderful parents and I'm looking forward to taking lots of pictures of the little one when she arrives. It'll be fun to take pictures of a newborn and try out some new poses and techniques that I have up my sleeve.

In preparation for the baby's arrival I recently attended Megan's baby shower and it was a wonderful afternoon full of adorable baby clothes, toys, and of course necessities. Everyone was asked to bring a child's book in lieu of a card but anyone who knows me knows that I can't NOT make a card. Here's the "let the CUTE begin" onesie card that I made for her.


The princess will be very lucky and I can't wait to meet her.

Wednesday, December 22, 2010

From Our House To Yours

This year I decided that I wanted our holiday cards to be simpler than last year's or the year before and I accomplished that - kind of. I don't do too well with simple but at least they didn't get in the mail at the very last minute, in fact they went in the mail last week and would have been sent earlier if I had stamps. I know some of you get them sent out right after Thanksgiving but I need a little bit more time to get into the Christmas spirit and get my creative mojo going.

Once I figured out my design concept, I began working on a sample and then cut all of the pieces so that I could work on them in an assembly line. That approach makes assembling each card go so much faster than if you cut them one by one. You get a rhythm which makes it much more enjoyable and decreases the number of errors that can occur. Yes it's a lot of work but I want those that receive them to know that I poured my heart into them. Also I like being that holiday card in the stack that is a little different from all of the others that they receive.

From our house to yours - Merry Christmas and Happy New Year!!!


Supplies Used:
  • Stamps: From Our House to Yours
  • Paper: real red, shimmer white, whisper white, soft suede, vellum
  • Ink: soft suede, real red (heart)
  • Other: red ribbon, oval punch, square punch (window), snowflake embossing folder, big shot, scallop edge punch, merry sizzlets

Sunday, October 31, 2010

Haunted Halloween Cards 2010

This year I decided to make a couple of different Halloween cards because it was more fun that way. The funny thing is that I finished making these last weekend but I didn't get them in the mail until.....yesterday - I know, totally embarrassing. I hope the kids that receive them forgive me. Here's how they turned out.


Hopefully you can see the texture from the embossed pumpkin and witches feet. Thanks to my photography class I know that you need side-lighting for texture but right now the sun is pretty harsh and isn't helping me with these shots. I think you get the picture though.....ha, ha.
Supplies Used:
  • Stamps: Wicked Cool, House of Haunts
  • Paper: Rich Razzleberry, Kiwi Kiss, Pumpkin Pie, Whisper White, black patterned paper (unknown source)
  • Ink: Basic Black, Versamark
  • Other: spider embossing folder, big shot, pumpkin pie corduroy buttons, polka dot embossing folder, black waffle paper, round punch, round scallop punch, buttons, twine, black embossing powder

Note: All products used are Stampin Up unless otherwise noted.

Wednesday, September 29, 2010


I plan on sending out a few Halloween cards and decided to start experimenting with some of the colors and stamp sets that I already had. This was suppose to be a prototype but I'm not completely in love with it yet so I'll continue playing in my scraproom.

Supplies Used:
  • Stamps: house of haunts
  • Paper: kiwi kiss, rich razzleberry, black patterned paper (source unknown)
  • Ink: basic black
  • Other: black embossing powder, versamark, corduroy button, twine, distressing file
Note: all products used are Stampin Up unless otherwise noted.

Tuesday, September 28, 2010

A Cute Little Deer


This past weekend I had a few of my crafty friends over for some card-making and scrapbooking fun. Here's a project that we worked on during our time together. Since fall has definitely arrived in Chicago, I thought it would be appropriate to create something with fall colors and a little deer to boot. We didn't stamp a greeting so that you can customize it accordingly.

Supplies Used:
  • Stamps: Deer Friends
  • Paper: soft suede, whisper white, Sweet Pea designer paper pack
  • Ink: soft suede
  • Other: scallop edge punch, gingham ribbon (American Crafts), faux stitching - paper piercer and white gel pen
Note: All products used are Stampin Up unless otherwise noted.

Monday, August 23, 2010

always time for you

A dear friend of mine from the library lost her father recently. It has been a difficult time for her and her family and I wanted to put together an extra special card for her to not only send my condolences but also to let her know that I'm always here for her. I really enjoyed painting the bench and was especially proud with how the grass turned out underneath the bench. You can read her beautifully written tribute to her father on her blog Life Chapter by Chapter.


Supplies Used:
  • Stamps: Time for You
  • Paper: basic gray, chocolate chip, riding hood red, whisper white, patterned paper
  • Ink: basic black, chocolate chip, old olive, always artichoke, riding hood red, soft suede
  • Other: riding hood red striped ribbon, eyelets, piercer
Note: all products used are Stampin Up.

Saturday, August 21, 2010

Pocket Silhouettes Birthday Card

My book club friend Peg is turning 60 and we are getting together to see "Eat, Pray, Love" on Saturday to celebrate and then the party follows with all things Italian. We have such a feast planned that we certainly will make Elizabeth Gilbert proud. It'll be a fun party and I'm really looking forward to the movie and the party that will proceed. I purchased a gift for her with the theme in mind and wrapped it in a pretty cloth napkin. The napkin contains a floral pattern and was the inspiration for this card. I loved creating it for our special Peg.

Supplies Used:
  • Paper: Kraft, whisper white, Bermuda bay, kiwi kiss, rich razzleberry
  • Ink: Versamark
  • Stamps: Pocket Silhouettes, Happy Birthday stamp
  • Other: white embossing powder, rich razzleberry dotted ribbon, dimensionals, scoring tool
  • Techniques: embossing, scoring

Saturday, July 31, 2010

Congratulations Soon-To-Be-Teacher

My hubby is always asking me to make cards for him to take to work and usally I get a couple of hours notice. He was gone and so I had some time that evening to pull together a card for a co-worker who is changing professions and is a soon-to-be teacher. This was a super-quick card with an apple theme. I've always wondered, do teachers really love apples? I hope this one does! Here's what I whipped together in a few minutes.


Supplies Used:
  • Paper: Green Galore, Real Red, So Saffron, Whisper White, Soft Suede
  • Ink: Green Galore, Real Red, So Saffron, Chocolate Chip
  • Stamps: Tart & Tangy, Numbers Stamp Wheel
  • Punches: Round Scallop, Circle Punches, Spiral Edge Punch

Sunday, April 4, 2010

Hoppy Easter!


While we didn't have the typical Easter dinner celebration with family this year, I did still get a couple of Easter cards made for my nieces and a few others. These cards were a little different because there was no stamping involved, just creative use of my punches. Isn't my Easter bunny adorable - I think so and I hope my nieces enjoy it. Hoppy Easter everyone!

I got the inspiration from this blog, click here for step by step instructions.

Friday, March 26, 2010

Presents for a Princess

My niece Katie turned 3 a couple of weeks ago but her birthday party is this Saturday. I decided to incorporate her favorite color which she told me was purple into the gift bag and the princess theme into her card. Sorry I can't reveal her gifts because she likes to look at my blog and I would hate to blow my cover!

I decided to "spruce up" the plain purple gift bag that I bought for her gifts. I wrapped the gifts individually and then put them in the bag so she could have a little fun unwrapping all of her goodies. I then brought out the Big Shot and used my new alphabet die set to personalize the bag for her. Simply pick out the cardstock and roll it through the Big shot which does most of the hard work.


Then I just adhered the letters to the bag to spell out "Happy Birthday Katie!"
(Please disregard the fact that the rows aren't in alignment - it's already driving me nuts but I have to just let it go, I don't think Katie will mind)

Then I filled it to the brim with gifts that any 3 year old girl would love.
Then it was time to move onto the card fit only for a little Princess. I decided to use pink instead of the purple this time - please forgive me Katie.

Supplies Used:
  • Paper: Basic Black, Whisper White, Melon Mambo
  • Ink: Melon Mambo
  • Stamps: Princess Time
  • Punches: Scallop circle, eyelet border, circle
  • Accessories: Bazzill ribbon, ribbon metal embellishment, rhinestones, big shot with polka dot texture plate

Thursday, March 18, 2010

Best Wishes Card Creation

On Sunday I had a group of my gal pals over for the afternoon to make some cards using Stampin Up products of course. With David out of town, I really enjoyed getting ready for the party and creating some unique cards. I wanted to make sure that the cards would allow the girls to try different techniques but also fun for those at different levels of experience with card making. We made 2 cards and this was the first one.

055 Can you see all of the texture yumminess?

Polka dots and texture – it’s just too much!

059

Supplies Used:

  • Paper: very vanilla, old olive, bermuda bay, patterned cardstock
  • Ink: chocolate chip, regal red (used markers instead of inkpads)
  • Stamps: oval all
  • Accessories: corner rounder, pink ribbon (American Crafts), big shot with polka dot impressions texture plate

Note: all products used are Stampin Up unless otherwise noted.

Monday, February 15, 2010

My Valentine, My True Friend

I didn’t get a chance to create a bunch of handmade Valentine cards this year but I did get a chance to make a few this past week. I didn’t want to post them before V-day, in fear that those receiving the cards would have the surprise spoiled.  Plus they got done at the last minute too didn’t help the cause but they were done just in time.

ice fishing, Drew's 12 bday 006

Above is the card that I made for the best hubby in the world. It took me a couple of tries before I got it just perfect for him.  I can’t believe that 9 years ago on 2/14/02 we got engaged during our trip to Daytona for the Daytona 500. I still remember how nervous he was and how relieved he was after he heard my “yes” after the big question was popped. I’m thinking we should head back there next year to celebrate 10 years.

ice fishing, Drew's 12 bday 004

The pink card above which was similar to David’s I sent to my littlest nieces back home. I included a couple of little treats for my little Valentine’s. Little girls love pink don’t they?  

ice fishing, Drew's 12 bday 007 

This last card I made for some other Valentine’s in my life but it didn’t turn out as well as I would have liked. I should have used green as the main card color but they got done. It’s definitely not one of my better cards but having a few “not so great” cards help to create the next best creation afterwards.

Happy Valentine’s Day everyone!

Thursday, January 21, 2010

You’re On My Mind

Over the past few weeks I have had a need to make several ‘get well’ and sympathy cards because it seems that when it rains it pours. In the last 2 weeks both of my parents have had to have surgery and two people I knew have passed away, including a family member. It puts things into perspective as to what’s important and what’s not such a big deal after all. I’m happy to say that my parents are doing fine and slowly but surely recovering. While my dad’s surgery was planned, my mom’s was not but necessary after her appendix burst. The timing wasn’t ideal (but when is it) and they had to miss my aunt’s visitation/funeral.

A former volleyball team member from high school passed away at the young age of 31. She left behind a husband and  two very small children, age 6 and 2. She had brain cancer and fought like hell but sometimes God has a different plan. She was one of the kindest people I knew and I can only imagine what her family is enduring at this time. While I was unable to attend the service, I was able to sign a guest book online, along with literally 100’s of others who lives she touched. I also made several sympathy cards this weekend that unfortunately are being sent to those who have lost loves one’s this past week.

I may not have the right words to say inside of the card, I hope that they will see the love I put into creating a card that shows how much I cared about their loved one’s.

It doesn’t seem right to share the details of how I made this card but if it helps someone else to create something beautiful for those suffering, then it’s the least I can do.

cards 003

cards 004

Supplies Used:

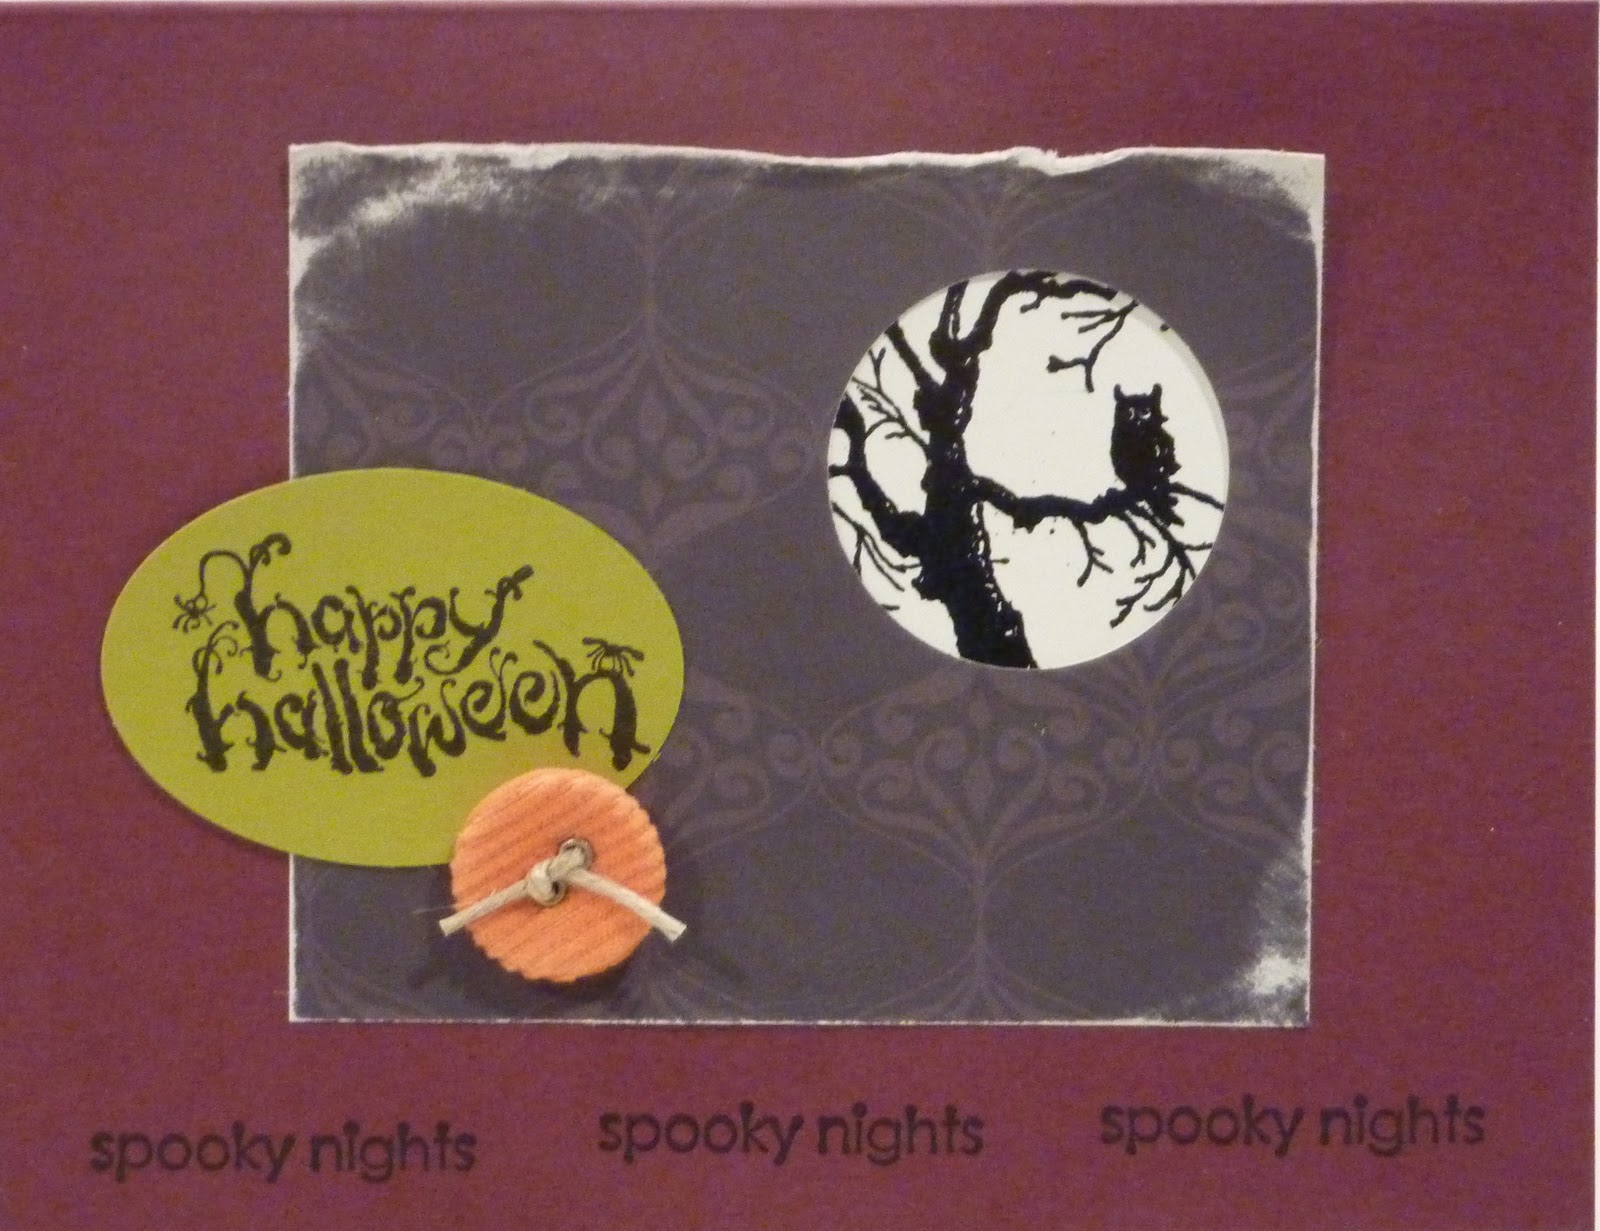
  • Paper: whisper white, basic gray, simply saffron, urban garden patterned paper
  • Ink: basic gray, simply saffron
  • Stamps: upsy daisy
  • Accessories: oval punch, oval scallop punch, scallop edge punch, silver elastic cord

Note: all products used are Stampin Up.

Monday, January 18, 2010

A Little Something Card

My new manager is starting on Monday and I thought we should welcome her with a card. Yes you can call me a brown-noser but I also love making cards and showing her I’m creative and crafty isn’t such a bad thing is it? Ok fine, call me a brown-noser but everyone else liked the idea at work too. It’s from our entire team so she’ll think we are all brown-noser’s right?!?!

I’m excited to finally have our new manager on board but extremely nervous at the same time. I met with her during the interview process but I just hope we click and have a positive working relationship right from the get go. My former manager who was promoted was absolutely fabulous (hence her big promotion) but I still miss her dearly, I learned so much from her and still do which is a good thing.

Here’s the details:

cards 004

cards 009

Supplies Used:

  • Paper: kiwi kiss cardstock, whisper white, urban garden patterned paper
  • Ink: basic gray, kiwi kiss
  • Stamps: Yummy
  • Accessories: kiwi kiss corduroy buttons, basic gray taffeta ribbon, dimensionals

Note: all products used are Stampin Up.

Sunday, January 17, 2010

Thanks A Bunch Card

I made this card for a co-worker that has helped out tremendously while we have been without a manager in our department. We all pitched in for a gift and I made the “thanks a bunch” card for everyone to sign. There’s nothing like a homemade thank you card, don’t you think?

Here’s the details:

cards 002

cards 003

Supplies Used:

  • Paper: whisper white, baja blue, rich razzleberry, hand drawn patterned paper
  • Ink: baja blue
  • Stamps: A Little Something
  • Accessories: rich razzleberry 1/2” polka dot grosgrain ribbon, scallop trim border, clear silver brad, circle punch, circle scallop punch

Note: all products used are Stampin Up unless otherwise noted.

Monday, January 4, 2010

Clear Stamps & New Punch Design by SU

A new year and new products available through Stampin Up and I couldn’t be happier with the improvements to the already fantastic product offerings.

New punch design

I love the punches from Stampin Up but the flatter design will make it easier to store and also has a lock down feature to take up even less room in your scrapbooking totes when you go somewhere else to make cards, create scrapbook pages, or create something else. I used the new punch on my holiday cards and it was so much easier to punch and the new designs are so refreshing too.

new clear stamps

Last but certainly not least, the option to purchase high-quality clear stamps is finally here. I tried them and love that they are the same quality as the regular wood stamps that has made them famous. The clear stamps are available at a lower price point than the wood stamps and the best part – they are stored in a cd/dvd case with the contents clearly labeled on the side for easy storage. I am in HEAVEN since I’ve run out of room in my closet where I currently store my stamps in baskets. These take up less space – so does that mean I can have even more stamps in my collection? I’m thinking hubby would say no. For those of you that love the wood blocks, don’t worry they will continue to offer them at this time.

Interested in trying these new products? I’ll be hosting a Stamping Open House at my home soon to celebrate the Sale-a-bration that will be going on. Stay tuned for details.

Thursday, December 24, 2009

2009 Holiday Cards

Going on vacation in December put me a bit behind in making and sending off our 2009 Holiday cards. After spending 13 hours working on the cards this weekend, I am happy to say they all went into the mail on Monday morning. I had to give myself a deadline to ensure they were received by our friends and family prior to Christmas. My procrastination created a great deal of stress, not to mention my right arm is so sore that I can hardly lift it above my shoulder. I decided that repetitive, physical work is not for me but the outcome was well worth the hardwork.

Monday morning all were sent off in the mail. Oh wait, this was only the first batch that went in the mail Sunday night. I ended up working until 1:30 am on the rest of them.

Where the creativity happened.

Here's a peek!

Another angle to show the embossing on the white cardstock. Yes, I didn't buy the paper that way, I ran it through my Big Shot.

Another view.


Supplies Used:
  • Paper: old olive, whisper white, bermuda bay, rich razzleberry
  • Ink: bermuda bay, rich razzleberry, old olive
  • Stamps: Delightful Decorations
  • Accessories:silver elastic cord, rich razzleberry polka dot ribbon, clear silver brads
  • Other: silver gel pen, ornament punch, scallop trim border punch (available in Jan 2010), poinsetta big shot die
Note: all products used are Stampin Up

I hope you enjoy our 2009 holiday cards because we sure have enjoyed receiving all of yours. While I would have loved to send them to everyone who has touched our lives, it simply wasn't feasible for us to do that.

Happy Holidays to everyone!!!

Tuesday, November 24, 2009

My Thanksgiving Final Touches

Remember these Thanksgiving Dinner invitations I made a few weeks ago for my guests? Well in making my final preparations for the big feast, I thought I would carry this theme to a few other things the guests would see during our Thanksgiving feast.


How about menus at each of the 4 tables (17 peeps in total) so that the guests can see what will be served during the big feast. There is a lot of food and they shouldn't leave hungry. I was a little stressed about the 22 lb turkey so I bought a ham as well - lots of leftovers and I already have some new recipes to try and use up all that delicious turkey.


This year in addition to using David's grandmother's fine china, we are using real linen napkins, I hope I don't regret this decision because there are a few messy folks coming but I guess that's what the washing machine is for. I decided to make my own napkin rings using some twine and stamping "bon appetit" on the tags.


What do you think? Simple but I like adding my own touch to things even though my husband said I was just making it harder on myself. Well the tags only took 5 minutes to make but rolling the silverware and typing the tags took about 30 minutes. Still not bad for a little touch, I want my guests to feel welcome.