background

Sunday, August 30, 2009

Browned Butter Blueberry Muffins

We had some blueberries that we were planning on making pancakes with this morning but we slept in a little longer than expected and had toast instead. However I was determined not to waste them and knew I needed to make something today otherwise once the workweek starts, it may not happen. So I went to the computer and went directly to Joy the Baker's website and did a search for blueberries. I came across these Browned Butter Blueberry Muffins and headed straight into the kitchen to bake up a batch. Boy am I glad I did! I learned how to brown butter and got to get my hands dirty in making the crumbly topping for these muffins. These are the best muffins I've ever had and I'm not normally a big fan of blueberry. Have some fresh or frozen blueberries laying around? Then make these, you won't regret it.

Freshly baked muffins.

Right out of the oven.
Ready to head into the oven after getting the crumbly topping.

The batter in the muffin pan, waiting on the crumbly topping.

Are you salivating after looking at these muffins.
If so click here for the recipe.

Darling Dots Sympathy Card

I love making cards but lately it seems I am about a month behind in getting them made. The problem with making homemade cards is that people come to expect them so you can't resort to running to Hallmark for a card at the last minute if you are a bit behind. So tonight my husband went out with friends and I decided to slip into my comfy pj's and create cards all night long. I had a great time and got lots of cards made - many past due but better late than never. I'll be posting my cards over the next week - I can't reveal all of my creativity at once now can I?

Supplies used:

  • Stamps - Darling Dots
  • Paper - kraft, whisper white, chocolate chip,
  • Ink - crushed curry, red riding hood
  • Accessories - square punch, scallop square punch, brown ribbon by Bazzill

Note: all products by Stampin Up unless otherwise noted.

Friday, August 28, 2009

Craft Punch Crush

While I am very loyal to only buying Stampin Up punches for my crafting pleasures, I have to admit that these new Martha Stewart edge and corner punches have me swooning today. I have so many ideas on how I would use this but without a doubt these would look adorable in scrapbooks, party invitations, and even some framed art. Martha Stewart Crafts is offering this on their website as a combination where you save $3 - an even better off isn't it now? Happy crafting!


Wednesday, August 26, 2009

A Brew for My Bro

A Happy Birthday card for my brother Nick.
Happy Birthday Nick!!!

This is the card that I made for my brother this year for his 31st birthday (sorry it slipped - I mean 29th birthday). His birthday was about 2 weeks ago but I did only get the card to him a few days late. But this year I really have a good excuse, we suddenly were faced with our ailing grandmother so the last thing on my mind was making cards. However it was a nice distraction and I knew he would appreciate the card with some ice cold brews on it, besides what more does a man want? Happy birthday Nick.

Cheers.

Tuesday, August 25, 2009

My Photo Shoot of Tanner

This past weekend I was finally able to put my new camera lens to use and I had a ball using Tanner has my model. Tanner is a Yorkie/Maltese mix and in our opinion - the cutest dog ever! Honestly, isn't he the cutest? Not only does he have the looks but the personality to match so he's a double bonus in our eyes.
Tanner is a very important piece of our family and we don't know what we would do without him - after a hard day at work, he is eager to welcome you home and make all of your worries fly out the window. We hope you enjoy our little show and tell of our baby Tanner.

We can't resist any pictures with his tongue hanging out, it's just so darn cute.

Here's another one - this is Dave's favorite picture.
Tanner striking his best pose - patiently waiting for the treat I'm bribing him with.
Now for the action shots, look at those ears flying in the wind.
Still jumping for joy.....
and jumping a little higher....
oh look at this leaping in mid air pose....
and he gets a perfect "10" for this jump/twist/somersault in the air...
Last but not least, Tanner running side by side with his buddy Daddy.
P.S. Have you told your pets how much you love them today?
P.S.S. Yes we know we're crazy in love with him but we're ok with that!

Monday, August 24, 2009

DIY: Chalkboard Plate

You may have seen the cute little plates that you can write on and use for special occasions but never wanted to spend the $25 dollars to get one for your home. You can use them when you host parties and write any message you want - Happy Birthday, I Love You, Welcome, or Let's Party. For those of you looking for a more practical use, how about making your grocery or to do list right on the plate. It's a way to guarantee that your Honey sees his to do list.

I found this DIY idea on Be Different Act Normal's blog and I thought I would try this project out myself. I also discovered how popular chalkboard paint was and I even learned that there is paint to make a dry erase surface. Who knew? Not only can you use the paint for practical things around the house such as making your own chalkboard for the kids to play with but you can make them as cute little gifts as well. What a cute teacher's gift don't you think? Ideas are limitless with this stuff - did you know some people even paint a whole wall using this paint?

Supplies:

Plate - lots of cute options at Homegoods, thrift stores, or your own cupboard
Painter's Tape
Chalkboard Paint - sold in paint can or spraypaint can
Newspaper/Cardboard - keep the over spray at bay
Glove - keep the hands paint free
Mask - so you can breathe healthy air

First you will want to tape off the area that you don't want to get paint on with painter's tape.
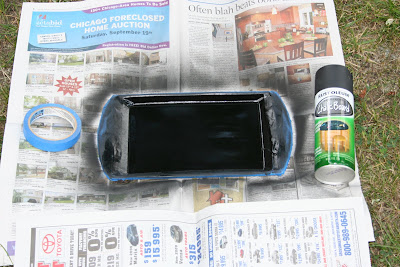
Following the instructions on the can, you will want to paint the area you want the chalkboard paint on. I recommend keeping the spray can about 10 inches from the surface and make sure you keep the can moving the entire time to ensure an even coat. Apply 2-3 thin coats.

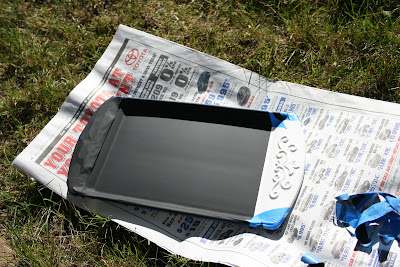
After the paint has dried, remove the painter's tape and admire your work. Ohh's and ahh's are welcomed and encouraged at this time.

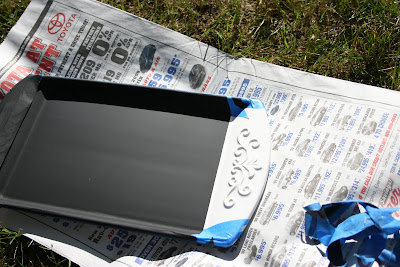
Precise taping is key so take your time.

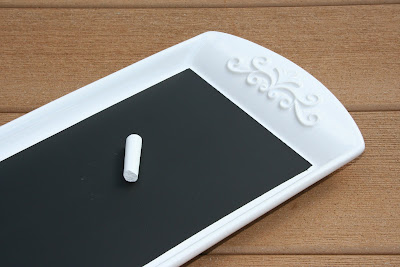
You will need to wait a full 24 hours (patience is required) to prime the chalkboard by rubbing chalk all over the surface and then erasing. You are now ready to put your work of art to use.

To display your chalkboard plate, use a plate or picture frame holder.
Please note - I had no patience and used the only holder I had in the house; it's not the right size or color but this was only used to show you my work so don't hold it against me please.

Tuesday, August 18, 2009

In Loving Memory of my Grandma

On Monday, August 17, 2009, my loving grandmother passed away after living 83 years of a very blessed life. I have spent the last week grieving the loss of such a wonderful woman and paying my respects to her. I was honored to have been asked to give the eulogy at her funeral and spent 3 days writing and re-writing this very important message for all to hear. Most importantly though, this was my grandmother's wish and something I had to do for her no matter how difficult it was going to be to give. I am happy to say that I was able to successfully deliver the eulogy despite my emotions - I surprised myself and everyone else that I was able to do this. I did it for Grandma - I will always love you.


Isn't she beautiful?

Beautiful flowers from the funeral.

I couldn't help but take more and more pictures of these flowers - they are the shining glory in our living room right now.

This is my new palm that is from the funeral too. I found the most perfect place for it in our dining room. I feel like I have my grandma watching over me now that this is in our house.


Below is a link to her obituary if you are interested in learning more about her beloved life.

Saturday, August 15, 2009

Julie & Julia - the movie

My friend Brooke (Second Time Mommy) and I went to see the movie "Julie and Julia" tonight and it was a great chic flick. Brooke actually was the friend that got me into blogging and so it was the perfect little movie for us to see on our girls night out date. I am so inspired after seeing that movie - what new blogging adventure should I start? - should I write something completely different? - should I take up French cooking?.....Nah but I may try that beef recipe, it looked delicious! At the very least shouldn't I poke my head into that cookbook?

If you are interested in seeing a really good movie with your girlfriends, I would highly recommend this movie. And if you are interested in reading the blog from Julie Powell that was the inspiration behind the movie and book then click here for more. And for you die-hards out that wanted to find the original Julie/Julia Project blog, click here. I love digging through old archives especially when they inspire a blockbuster movie and bestselling book. Oh wait a minute, I just found the real New York Times article that launched Julie from blogger to real writer almost overnight, how exciting is that? The article was written when she had 13 days and 22 recipes left to reach her goal.

Bon Appetit.


Friday, August 14, 2009

Mini Calendar Idea

While we have 4 1/2 months before 2010, I couldn't help but share this adorable mini 2010 calendar from Maya Road with all of you. It's the perfect way to use up all of your extra cardstock, patterned paper, and embellishments from scrapbooking to make a mini calendar for your desk. The cool part is that if you decide to include photos on the pages, you can easily take off the calendar part and put it into a scrapbook, it's like making a calendar and scrapbooking pages at the same time.

I've already looked to see if it's already available in stores but it's not so I'll have to wait a bit. Wouldn't this make a perfect holiday gift? Well at least I would love it as a gift. The Maya Road calendar which is 4" x 4.2" and the cool acrylic stand that you perch the calendar will be available soon.


More Checklists - Love This One!

Remember the checklists I shared with you a few weeks ago? Those awesome printable checklists to make your life easier? Here's a reminder in case you missed it, just click here.

Well Erin from Vale Design did it again and has another awesome downloadable template for us to print and use. It's the HoneyDew checklist and I know you've gotta love that but I don't know if the Honey will like it as much. I have the best hubby ever so I don't need a checklist for him but I think it'll really come in handy when I'm traveling for work because when the cats away the mice will play.

Thursday, August 13, 2009

What's Your Design Style?

I'm 43% Nantucket Style
29% Cottage Chic
and 28% Modern Elegance

So what should I call it - Nantucket Cottage Chic Modern Elegance?
How about Stylish, Chic, and Elegant - did I just describe myself? Ha...

What are you? Check out Sproost for a fun way to learn more about your design style, I think it hit the nail on the head for me. What I really liked was the description and beautiful pictures that they showed for your style preference. It's fun, quick and very informative.

So what is Nantucket Style?
Well I love the beach and my dream home would be in a beach town but since that isn't possible I've brought the beach into my home - yes I have. For my art and accessories I prefer things that speak to beach activities or the feeling that being at the beach brings to me (check out my wall art, it's all very beachy). I love the look of driftwood and prefer fabrics that are naturals, cottons, and linens. As far as colors I get my inspiration from the beach - white, light beiges, and grays of the sand and driftwood, a variety of blues for the ocean and sky, and greens and vibrant blues of sea glass.

What is Cottage Chic?
I love the carefree spirit that the cottage interior inspires but I am also serious about modern art and hip treasures. I love old and new alike, and love to highlight them all to expose the uniqueness of each.

What is Modern Elegance?
Variety is the spice of life and nowhere is that truer than in design of my home. I love contemporary but wish it wasn't so cold and austere and I'm also drawn to traditional rooms. I want to create a less cluttered and busy space so this traditional style is contradicting styles. These contradicting styles is what makes this mix so successful.

I hope you check out Sproost and peruse through my Nantucket Style pictures below. They are so inspiring to me and will certainly help as I try and create this style in our home.


Aren't looking at beautiful rooms and interiors so inspiring? I feel like I'm at the beach relaxing, if only that were true!